Wednesday, July 31, 2013

Brownie-Cookie Bars

   Here I am, baking again! Actually, that shouldn't really surprise anyone, I love to bake. Baking is my one get away from reality, when I don't have any new books to read. I also felt like my father should get a sweet treat after his long flight home from India, and what a sweet treat this is! I actually did not follow a recipe time, I just threw two things together and hoped for the best. I have made Brownie-Cookie Dough Bars, so it is basically the same idea. And, I'll admit, I did use a box brownie mix, and only because my attempts at making brownies from scratch failed. Multiple times. They just come out too crumby! Besides, I am all out of cocoa powder from make the brownie in a mug for my sister, Macy. Boy does she love those! 

Anyways, you will want to get all your ingredients together. The easiest way to make this recipe is to get pre-made brownie and cookie mixes, but I used this recipe for my cookie part. I actually only made half that cookie recipe and still found that I had some leftover dough. More cookies for me!

   After you get your ingredients you are going to want to prepare the brownie batter. Make sure to follow the directions on the box, since every mix is different. Then spread the batter into a greased 9x13 pan. Set aside for now.

   Next, prepare the cookie dough. Follow the given directions (make only 1/2 the recipe if making your own cookie dough) and then drop spoonfuls on top of the brownie batter. Now this is where you can get creative. You can swirl the cookie dough or spread it to cover the brownies, just make sure it is on top of the batter.


    Bake for 40 minutes and viola! You have made yourself some amazing brownies!


Recipe:
1 box Brownie Mix, prepared
1 box Cookie Mix, prepared

1. Preheat oven to 350˚ and grease a 9x13 pan. You can also line with parchment paper
2. Spread the prepared brownie batter so that it is evenly distributed within the pan. Then drop spoonfuls of the prepared cookie dough on top.
3. Bake for 40 minutes or until a toothpick comes out clean.
* Cool completely before cutting*

What did I do with the remaining cookie dough? Make cookies of course! Just follow baking instructions for the cookies, which normally cook for 8-10 minutes.


Try this recipe? Comment down below and tell me how it went!

Monday, July 29, 2013

Southern Peach Cobbler

  One thing about living in my house is that there are five seasons: Spring, Summer, Peach season, and Fall. And it is Peach season right now! There is a time right between Summer and Fall where all the fruit ripens, but peaches tend to overtake any of the other fruits produced on my "mini" farm. And then we get too many peaches, and don't have enough recipes to use them all! During Peach season we have buckets all around the house just filled with peaches ready to be used. And we can never use them all, even when we give them away! This is also the time of year where we eat peaches with almost everything, and all the peaches we dont use go to the chickens. Even then we can't get rid of them fast enough!
   So what do I do? I go on Pinterest and find recipes where I can use peaches. And, surprisingly, most of the peach recipes are pies or cobblers, with the occasional peach smoothie or peach ice cream. This time I found a peach cobbler that looked pretty tasty, and adapted the recipe from the original recipe found here. And man is it amazing!! The whole family will love this recipe, and it is one that will be made until we are sick of it! I have even taken this recipe to share with other families too, and even they loved it. So, if you experience Peach season in your household like I do, this will definitely be a recipe to try! This recipe is as easy as 1-2-3! And (as a bonus) this recipe makes the house smell absolutely wonderful.

First you will need some ripe peaches! I would recommend 4-8 peaches depending on the size. These beauties came off a dwarf peach tree in my backyard! We would have left them on to ripen longer, except KD kept tearing them off and eating them as a snack. Everyone loves their peaches in this family!

Then you are going to want to dice up your peaches. You can also cut them into slices, whatever your preference might be. Don't forget to de-skin them too, nothing is more unpleasant then trying to bite into your cobbler just to find a nasty skin.

   Then you will toss your peaches in a very large bowl with all the ingredients in part one. And yes, you will need a very very large bowl, since you will have a lot of peaches. Then pour that whole mixture into a 2 quart pan, and bake for 10 minutes.
   While your peaches are cooking, it's time to make your topping. Stir the dry ingredients together, then mix in the butter, and then save the water to add in last. When your peaches are done, coat them in the topping right away. Try to spread it out as much as possible, but it's not a big deal if you can't.

And then bake your whole confection for 30 minutes. If it is not done by then, then bake it until it has a nice golden brown color to it. Sprinkle some cinnamon-sugar on top, and then you are ready to go! This is definitely best served warm, but it tastes just as good either way.


Recipe:

Part One (Peaches)
4-8 Peaches, peeled and diced
1/4 cup White Sugar
1/4 cup Brown Sugar
1/4 teaspoon Cinnamon
Pinch of Nutmeg
1 teaspoon Lemon Juice
2 teaspoons Cornstarch

Part Two (Topping)
1 cup Flour
1/4 cup White Sugar
1/4 cup Brown Sugar
1 teaspoon Baking Powder
1/2 teaspoon Salt
6 tablespoons Butter, soft and cut into pieces
1/4 cup Boiling Water

Part Three (Cinnamon-Sugar)
3 tablespoons White Sugar
1 teaspoon Cinnamon


1. Preheat over to 400 degrees F
2. In a large bowl, combine peaches with the rest of part one in a large bowl and mix until the peaches are well coated. Pour into a 2 quart baking dish (un-greased) and bake in preheated oven for 10 minutes.
3. In a different bowl, combine all the dry ingredients in part two. Then blend in the butter until it resembles coarse meal. Stir in the water until just combined.
4. Drop spoonfuls of the topping over the peaches while still hot. Try and cover the peaches as much as possible. Then, sprinkle with the cinnamon-sugar before replacing peaches in the oven. Bake for 30 minutes, or until the top has a nice golden-brown color.

note: This is best served warm! It can be heated in the microwave, and be kept for up to a week(if it doesn't get eaten within the first few days)


Have you tried this recipe? Tell me down below in the comments!

Monday, July 22, 2013

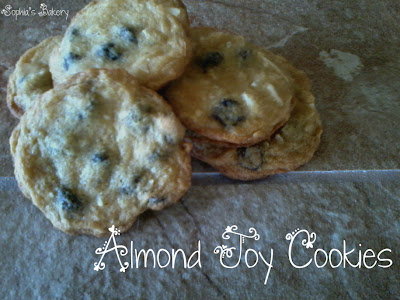
Almond Joy Cookies

   This time I have an actual recipe....that you can share with people! Because, sharing is caring right? Unless you are in my household, we definitely do not share well! Well, we don't share the super yummy foods, so someone always ends up getting more than the other person. Oh well, at least the food isn't going to waste! Actually, the food would never go to waste, it would go to my herd of chickens. That's right, I have somewhere around 30 (give or take a few) chickens, and they get all the leftovers that we do not eat! Which doesn't happen very often, my family is good about eating food!!
   Alright, so these cookies are a twist off the favorite chocolate/almond candies, Almond Joy. I mean, who doesn't love the perfect chocolate/coconut to almond ratio? I know I do! And I had decided to make a cookie to honor the times when the candy cannot be found around the house (Bummer!). They are still amazing, and you can even drizzle chocolate over the tops of the cooled cookies if you are looking for that extra chocolate-y flavor. And I found this recipe on the back of a shredded coconut package. SCORE!


(The Most Important thing is to) Grab all your ingredients out of the cabinet. I will have the full recipe below, with picture-steps for those that like visuals! You will need a large bowl, since this is a huge recipe!

Preheat your oven to 375˚ and grease your cookie sheet, or line with parchment paper. What ever works for you!


Now, in a large bowl cream together your brown sugar, white sugar, and softened butter. The more it's mixed, the better!


Beat in your eggs one at a time. The dough might be a little water-y looking, but that's alright! That will get evened out later. I beat my egg with a spoon, but a fork would work and a whisk might too. I don't know, try new things!


   After your eggs are well incorporated into your mixture, you are going to add in the vanilla! This part is easy, because all you have to do is stir it in.

The next hing you are going to do is add in the flour, baking soda, and salt. This is what will give the dough a more dough-like consistency. Stir until everything is combined. The dough will get thicker  so make sure there aren't any hidden, flour-filled bubbles in your batter. If you have had that happen before, then you know what I'm talking about. If not...well, you do not want that!

And the final thing before baking....adding in all the good stuff! This is the part where you combine the coconut, chocolate chips, and almonds. Adding these things will not only give texture to your cookies, it also gives that almond joy taste that many love!

After everything is combined, drop by the spoonful onto the prepared sheet. Make sure to space them well, as they will spread out! Bake and enjoy(:


Finished product! Yumm ♡


Full Recipe:

Ingredients:
1/2 cup Butter, soft
3/4 cup White Sugar
3/4 cup Brown Sugar
2 Eggs
2 teaspoons Vanilla
2 1/4 cup Flour
1 tablespoon Baking Soda
1/2 teaspoon Salt
1 cup Coconut
1 cup Chocolate Chips
1 cup Almonds, Chopped

1. Preheat oven to 375˚ and grease a cookie sheet, or cover using parchment paper.
2. In a large bowl, cream together both sugars and the softened butter util creamy. Beat in the eggs, one at a time, then stir in the vanilla.
3. Stir in the flour, baking soda, and salt. Make sure everything is well incorporated.
4. Add in the coconut, chocolate chips, and almonds, stir until everything is evenly distributed.
5. Drop spoonfuls onto prepared cookie sheet. Bake for 6-10 minutes, or until the edges begin to brown. Cool and enjoy!


Did you try this recipe? Tell me how it went for you below in the comments!

Monday, July 15, 2013

Just a Little Hike

  Okay, so Laurie decided to take the day off so we could go on a hike! So we drive up Mt. Rose highway and get off at this trail head sign. We took the dogs with us too, they really needed the walk! And since there were three of us (Laurie, Macy, and I) and three dogs (KD, Lilly, and Spritze), it was perfect to go on this trail. The weather cooperated well today and wasn't roasting hot either, when we were walking it was only 77*. Pretty nice for a summer day!
   So we took the dogs out on this trail, and they loved it a lot! There was a lot of wildlife to see, and a lot of shade on the trail too. Sometimes it is nice to just get away from all the busy-ness and 
take a hike through the woods! It was also nice that it was fairly empty, then we wouldn't have to deal with our dogs barking so much! The one thing about this trail is that it is a lot of uphill walking, which isn't too bad since it was just a short trail. There were many littler trails connecting to this one, but we mainly stayed on the original trail. The last thing we want to do is get lost in the woods! 
   The colors in the forest were just beautiful. There is never a better time to go camping then when nature is in it's full glory. Speaking about camping, I am going next weekend to camp with Laurie and Macy! Anyways, all the flowers were in full bloom, and it was just a lot of greenery all around us!

    Sometime down the trail we came up to this little creek. How cute! There was also a lot of water going through it, which was a surprise due to the fact that it has been all heat and no rain here for the past few weeks or so. The water was definitely refreshing, as well as beautiful to look at! It was flowing nice and steadily  it even had a cute little bridge to cross over on! KD kept getting her hand stuck in the cracks between the boards on the bridge, but we made through!


I think the dogs liked it too! KD was in the water before anyone else! I actually took a slide down a tiny hill where I lost my footing, almost fell into the water myself! She would have stayed in the water all day if we didn't pull her out to move on! She was drinking the water too, and finally we got the other two dogs to drink some water as well. Lilly walked around in the water too, but she is just too fast to get a picture of!


   After the creek we moved forward on the trail. It was almost to an end! When we hit the end we crossed the street and went up to another trail that was quite close. This trail took us to an old Fish Hatchery and pond! The fish hatchery is no longer opened, but it is getting remodeled and ready to be re-opened as a recreational center. For boy scouts maybe? Anyways, inside the windows it was very spacious and looked like it had a mini kitchen or something. Totally cute and could work for a house if needed! It also overlooked this beautiful pond, and most of the forest as well. 
   This pond is man-made and stocked with fish as well. There were a couple families out fishing today, but we could all see the fish jumping in the middle of the lake, no where near the fishers! It's all in good fun, though, and that is what counts! KD also walked around in the shallow end of the pond, that dog loves her water!

After the pond we looped back around and went back to the car to eat some lunch. I had a turkey sandwich with grapes and a water, while Macy and Laurie ate ham sandwiches. The dogs even got their own little ham sandwiches! My dogs are soo spoiled, and they know it. It was nice to go on that hike, and the best part is getting to go home and taking a nap afterwords! All the dogs are tired as well, which makes everyone happy!!


Do you like camping or hiking? If so, comment where down below!

New Addition To The Family!

   Hi there! This post isn't about anything that I have baked, but a little bit more into my personal life  For anyone that doesn't know me personally, my family LOVES their animals! We have dogs, cats, rabbits, birds, and even chickens in this family, and every single one of them is considered part of it. Before yesterday we had only three dogs: A smart dog, an old dog, and a dumb dog. They are amazing, and I can see why they are considered mans best friend! Our dogs go everywhere with us, they are just like little kids! The smart dog is even called the golden child, if you can believe it!
   Then a friend of my stepmother said that she had to give up her dog. The friend lives in a condo and there have been a few barking complaints about her dog, hence the reason why she had to give it up. Now, we have had this dog before and know all about her, so my stepmother, Laurie, said that we could take the dog! The dogs name is Lilly, and she is just the sweetest little thing!
   Lilly is a Jack Russel Terrier with soo much energy! She is a little skittish around unknown people, and she does like to bark if shes left in the room by herself. But you will have a hard time finding a dog as sweet as this one! She is also the new "girlfriend" of my smart dog, Spritze, as well as a playmate for him. All is well back here at home! And Lilly fits in as if she never left.

   Lilly definitely brightens the home, and all those that know her. At night she even likes to curl up by your head! It is a cute gesture  but it definitely gets annoying to have a little ball of fur radiating heat while trying to sleep in 80-90* weather.

   Lilly's favorite thing (other than being loved) is water! We have a pond with a working waterfall/wading area, and she will play with that all day long! She loves the flowing water, and tries to eat the bubbles in the waterfall. It is the cutest thing! She comes out of the pond soaked from the legs to under the belly- even her chin! She also likes to watch all the little goldfish in the pond, while I stand by waiting to see her fall in!


Pond in the winter time, it does freeze over when it is cold enough.
   Yes....she is already learning the bad habits of the Spencer dogs! And dad's not even home to do it! Lilly is already a master begger/sitter, along with KD(the old dog), and Spritze(the smart dog). She is also great at jumping on top of tables(when possible) so we have to watch out, or our food will be gone! And don't even ask about the human food.... she will eat anything!

   Lilly is also good with all the other animals roaming around the house, which is always nice to have! She likes to go give the chickens fresh water with me, and she doesn't even chase them! She also just walks right by the cats, not even acknowledging them! I guess you could say that because they are bigger than her (maine coon cats), but it is good that she doesn't chase them. It's good that she gets along with everyone!

   Well, Lilly, it is nice to have you back in the family. You are guaranteed to get spoiled (and fat), as well as receive all the love we can give. Welcome to the Spencer family!

Thursday, July 11, 2013

Cupcake...in a Cup!

   Yes...I know, ANOTHER mug recipe! But they are soo fun to make, as well as quick and easy too! This cupcake is perfect for celebrating your very own un-birthday. That's always fun, right? I know that I spend every day like it's my un-birthday, treat wise that is! And you can make this into different flavors too, vanilla is such an easy flavor to manipulate! I actually found this recipe on Pinterest, but it originated Here. Such a cute little website for anything you could possibly need! I love websites like that!
  But, back to the cupcake. It is the basic vanilla cake, which is a lot different than the usual chocolate mug cakes found on Pinterest! Although, you could easily add 1 Tablespoon Cocoa Powder to your cake if you love chocolate.

   Maybe it isn't your birthday, but the birthday of someone you know. And you don't want to make an entire batch of cupcakes, and you have forgotten to get a present. In a quick 5 minutes, you can have one of these bad boys up and ready to go! Just make it in a little cup, and it is ready to go! Very tasty as well. I don't know, just an idea?
   Or, you can just celebrate your own un-birthday! Who's to judge you? I definitely won't, I will be right there next to you eating the same thing! I mean, it is someones birthday somewhere, right? It's just like the saying "its five o'clock somewhere."
Add a little sprinkles to the top! Or maybe put chocolate chips in the batter. Whatever works! This is your cupcake, and you don't have to share with anyone else. It is definitely not sharing size. Go crazy with it!

Recipe

2 Tablespoons Flour
1 1/2 Tablespoons White Sugar
1/4 Teaspoons Baking Powder
Pinch of Salt
2 Tablespoons Milk
3/4 Tablespoons Oil
1/4 Teaspoon Vanilla Extract

1. Mix all the dry ingredients together in the mug of your choice.
2. Mix in the Milk, Oil, and Vanilla Extract until it has a nice, smooth consistency.
3. Bake in the microwave on high for 1 minute. If it is not fully cooked, cook in 15 second intervals, or until        the top has set.

It will be hot! Cool and enjoy(:

If you tried this recipe, tell me how it went in the comments!

Wednesday, July 10, 2013

Doughnut In A Mug

   I'm back again! And yes, I DO love my single-serve, desserts in a cup. They are just soo simple and easy to make! The perfect size too when you are hungry. The nice thing about these doughnuts is that they do not yeast, and there is no "waiting time" for the doughnuts to rise for 30 minutes-1 hour. Now THAT is a huge pain! And I really don't have time for that.
  Anyways, I was hungry and craving a nice little snack, so I hopped on over to Pinterest and searched "in a mug recipes" where I found this lovely recipe from BestRecipes.com and knew I just had to do it! I also have a few pictures this time too, because who doesn't love pictures?


Step one: Combine the brown sugar, flour, and cinnamon in a mug. I used a mug with a rounded bottom, so my doughnut came out rounded, but you can use any mug you have on hand.

Step two: Add in the egg and stir. It won't mix very well, just in case you think you did something wrong(I know I thought that). Then mix in the milk and the oil, it should have a creamy texture with a few bumpy spots in it.


Step three: Cook in the microwave in 30 second increments, or until the top has set. Mine cooked for 1.5 minutes. Then, use a knife to loosen edges, and pop out doughnut onto a plate. You can cut the doughnut as well, to make smaller sizes.


You can see the rounded bottom, that was just because of the cup used.
Step four: Mix the cinnamon and white sugar, then coat the doughnuts in them. If the sugar mixture isn't sticking, you can dip the doughnuts into melted butter first. Enjoy your mini doughnuts now!


Recipe:
3 Tablespoons self-raising Flour
2 Tablespoons Brown Sugar
1/4 Teaspoon Cinnamon
1/2 Egg, beaten
1 1/2 Tablespoons Milk
1 Tablespoon Oil

Topping:
1 Tablespoon White Sugar
1/4+ Cinnamon
Butter, Melted (if needed)

1. Put dry ingredients into a coffee mug, and mix. Add the egg.
2. Add the milk and oil, mix until everything is well incorporated.
3. Loosely cover the mug, and microwave in 30 second increments, or until the top has set.
4. Loosen up the edges of a doughnut with a knife, then dump it onto a plate. You can cut the doughnut into 2-3 pieces if desired. Then combine the sugar and cinnamon in a small bowl. Roll the doughnuts in the cinnamon-sugar until well coated, use melted butter if the mixture is not sticking.

Enjoy!


Recipe | Here       

Drumstick Milkshake

   Boy is it hot out there! It is 93 outside, but feels waay hotter than that. And, right now, there is nothing I would rather do than go swimming. Or, at least something other than sitting at home all day! Thankfully there is ice cream in the freezer and fans going on high! And if I get hot enough, there is also the hoses, I can have a little water balloon fight with myself!
 
   Naah, I wouldn't have a one-man(girl?) water balloon fight. Instead, I came up with this BRILLIANT idea of creating a milkshake. Most of the recipes online require some weird ingredients that I don't have, so I came up with my own recipe. This is a single-serve recipe that is perfect for a hot summer day!

Recipe:

2-3 Scoops Ice Cream (any flavor)
1 Cup Milk
1 Drumstick Ice Cream Cone (any flavor)
Peanuts (optional)

1. Throw everything into a blender, then blend it until it is smooth. You can add in fruit, peanuts, or anything else you want in your milkshake. Go crazy with it!
2. Pour in a tall glass and enjoy your tasty milkshake!

If you make this recipe, Tell me how it went down in the comments!

Brownie in A Mug

   So, as my first post I will be posting about this Brownie In a Mug. The recipe originally came from Pinterest, and is fairly easy to make. Aaand, it is perfect for one person! Actually, I am just too lazy to make a whole batch sometimes.

   Anyways, this little cup is full of Brownie goodness! It is the perfect serving size, and quick to make too. It took me all of 5 (five!) minutes to make this delectable, and I am pretty proud of myself too!


Here's the recipe so you can try it too:

Recipe:

1/4 Cup Flour
Pinch of Salt
2 Tablespoons Vegetable Oil
2 Tablespoons Unsweetened Cocoa Powder
1/4 Cup Brown Sugar
2 Tablespoons Milk

1. Mix together all the dry ingredients into a coffee mug of your choice. Then add in the Milk and Vegetable      oil, and mix until well incorporated.
2. Microwave the mug in 30 second increments, or until the top has set. It will be hot coming out of the microwave!! Enjoy!

This is my first post, so there are not many pictures. I am hoping to get more as I go along, as well as being able to write better posts as I get further along. Comment below if you tried this recipe!